Showing posts with label make it. Show all posts

Thursday, May 3, 2012

make it: water globe


This gardening thing can be tough day in and day out. Remembering to water, watering enough but not too much and the like can have a newbie gardener wondering what to do. So I went looking for tips or tools that promise to make watering easier. Enter water globes. These brilliant inventions can be filled with water and planted in pots or the ground alongside your seedlings and plants. The globes release water slowly and when the soil around your plant needs watering. The downside to these globes is that they are not super cheap, especially when you have a pot for every day of the week and then some.

Luckily, some crafty women got the inspired idea to make their own globes on the cheap. I followed their instructions and modified a bit to suit my needs. If you're interested in making your own globes, read on!

the goods

several bottles with their lids ( I used clear, glass soda bottles because I liked their look the best, and I had a bunch. But you could also use milk bottles, canning jars, water bottles, etc)
hammer
nail or screw
kitchen sponge


directions

1. select bottles and empty contents.
2. remove lids and soak bottles with labels in warm, soapy water for 10-15 minutes.
3. while bottles soak, hammer 4-5 holes into each lid (for canning jars, make more holes). holes allow the water to drip out less quickly, allowing for more controlled watering and longer periods between refilling the bottles.
4. remove bottle labels. submerge kitchen sponge in soapy water and rub against outer wall of bottles to remove any glue residue from the labels. make sure to also wash the inside of the bottles thoroughly.
5. fill bottles with water and dissolvable plant food and screw caps back on the bottles.
6. dig a hole next to each plant, deep enough for half of the bottle neck to be buried in the soil. place bottle in the soil, cap down and press soil against it do the bottle is secure in the soil, either at an angle or upright. you can also use the outer edge of the pot to help support the bottle.

sit back and admire your handiwork. enjoy not having to water your plants daily anymore. monitor the water levels in the bottles, and refill when the water gets low.

Sunday, March 4, 2012

make it: crepe paper wreath

yellow crepe paper flower wreath in progress

I've been thinking Spring lately, and want to be totally prepared when it comes.  With that in mind, I picked up a few green wreath forms, crepe paper and glue gun refils for a project I wanted to try.  I've seen crepe paper flowers all over the web and thought a bunch would look pretty around a wreath.  I'm sure I'm not the first one to think of this idea, but I still think it is a fun, easy and inexpensive way to get a spring wreath for your door in time for the warmer months.  To make a wreath similar to this one, you'll need:

2 rolls of crepe paper in the color(s) you'd like your wreath to be
a wreath form
glue gun and hot glue sticks
scissors
opposable thumbs (to acquire and master crepe paper twisting skills)

step 1 - wrap the wreath

start by taking a roll of crepe paper and gluing the end of the paper on to the inner rim or back of the wreath form.

wrap the crepe paper around the wreath form, pulling the paper taut, and overlapping each loop with the previous one. 

make sure as you wrap the wreath form that no green background is visible. continue until the entire wreath form is covered in crepe paper.

a crepe paper flower
  
step 2 - make the flowers

cut about a 2 1/2' piece of crepe paper and begin twisting it  loosely until all 2 1/2' has been twisted. 

begin at one of the ends and roll the twisted crepe paper into a snail (and eventually flower) shape, letting some of the paper be more loosely twisted and other parts have a tighter twist to make each flower look unique. 

when you reach the end of your piece of paper, glue the end flush against the flower so that you cannot see where the paper stops or begins.

repeat until you have enough flowers to fill the wreath (I needed 16).

my pink crepe paper wreath

step 3 - adhere the flowers to the wreath

using a hot glue gun, secure the flowers to the wreath.  put a dollop of glue on the back of each flower and press it firmly on to the wreath.

hang and hope for Spring!

Friday, February 17, 2012

before & after: striped rug


If you've read my blog before, it's likely you know what a little terror my 8 year old Australian Shepherd, Dusty, can be.  Terror is also a good way to describe the emotion one look at my carpet brings out in me.  Where Spot Shot hasn't worked, I am hoping rugs can.  Six rugs in a 615 square foot apartment seems like overkill, but when the alternative is visibly stained carpet, I'm ok with it. 

Finding and financing 6 rugs that I like enough to grace my floors is another problem.  Until, I got the brilliant idea to spray paint a cheap, bland-looking rug in a style that is consistent with the rest of my decor.  I've been a fan of using spray paint to spruce things up for a while.  I've used it to update my coat rack and to make my picture frames appear uniform on the wall.  I had my doubts about whether this experiment would work.  But figured if it was absolutely awful, I could turn the rug over and no one would be the wiser.  Thankfully, the project went off without a hitch, and I have a rug I am happy with for under $25.

the goods

1 rug
spray paint (I bought one black and one white canister of flat spray paint)
2 strips of cardboard as long as the rug's width (or something like it to cover the section of rug that you dont want to be painted)
drop cloth (to protect the area where you will be working)


how to

1) lay down the drop cloth in the area where you intend to paint your rug.  Place the rug on top of it.
2) cut two strips of cardboard as long as the rug's width and as wide as you want your stripes to appear on the rug.  If you want different stripe widths, cut several strips in different widths.
3)  place one strip of cardboard on the rug below where you want the first stripe to be.
4) pick a paint color and spray the exposed part of the rug evenly until the paint has covered the rug and the original color of the rug cannot be seen.
5) let the paint dry before moving on to the next part of the rug.
6) cover the painted part of the rug with one of the cardboard pieces.  take the other cardboard piece and place it on the rug so that there is a section of rug exposed between the two cardboard pieces.
7) Take your second color and spray the exposed part of the rug evenly until the paint has covered the rug and the original color of the rug cannot be seen.
8) Repeat steps 6-7, alternating colors, until you have finished painting the rug.
9) Let the rug dry thoroughly before placing it in your home.

Wednesday, February 1, 2012

make it: super bowl table cloth


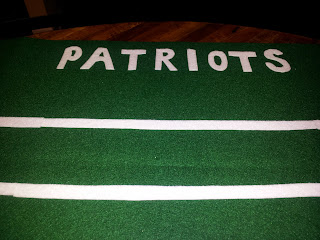
This year, my boyfriend is hosting a Super Bowl party at his house.  I agreed to help with decorations and food.  Last night, I made a football field table cloth for the day.  It was an easy DIY and I think it will make an impact on his kitchen table.  I've outlined how you can make your own below:

Materials:


large, rectangular sheet of green felt
3, 8.5 x 11 sheets of white felt with adhesive backing
tape measure
straight edge (ruler, level, etc)
pencil
scissors

Directions

1. Lay out your piece of green felt.
2. Flip your white felt so that the adhesive part of the felt faces upwards, but do not remove the backing to expose the sticky part of felt.  With the felt positioned vertically, make tick marks every half inch, and draw a straight line down the length of the felt for every tick mark.  These white strips will help make up the lines on the football field.


3.  Cut out each strip of white felt and group into sets of three.  You will need nine sets of three to make your yard lines.


4. Trace the letters of each team name onto the back of another piece of white felt, as well as the numbers for each yard line.  You will have to trace the numbers twice.  If you want to print out letters letters and numbers from your computer and trace them onto the felt, you can do that.  I chose to freehand the letters and numbers for the purpose of quickness and to make the tablecloth look a little more handmade.


5. Cut out all of the letters and numbers.


6. Measure your green piece of felt and place the yard lines equidistant from each other on the felt. When you have the yard lines the way you want them, remove the backing and adhere to the green felt.  Place the names of the teams on either side of the felt, near the end zones and attach once you are happy with the placement.  Place the numbers on each yard line (see picture for suggested placement), and stick to the green felt when you are satisfied with the way the numbers look.

Et voila. A tablecloth worthy of the Super Bowl!

Sunday, January 8, 2012

make it: sequin board


I wanted to make something glittery for New Year's Eve, and was inspired by Jordan Ferney's post about her sequin wall creation. I remembered seeing some images of Kate Spade's flagship store where they did something similar and set to work to find large gold paillettes. Six phone calls to craft stores, specialty art shops and Target, and I was still coming up empty-handed. So until my online order comes in, I have been making do with smaller sequins. I picked u a few packages of multi-colored 8 and 10 mm sequins, foam board, 4x4 canvases, 24K gold spray paint, acrylic gold paint and sequin pins from Michael's.


I painted a few of the canvases with gold paint and waited for the canvases to dry. I also sprayed the foam board with the gold spray paint. The foam board does not take nearly as long to dry. I then lay a ruler against the side of the canvas to help measure out where to put each sequin. I placed the first line of sequins on the board and punctured the center holes with sequin pins, one for each sequin.


Then i measured down another side of the canvas and repeated my process until the board was covered in sequins. I nailed the sequin pins into the wood around the edges and then punched the sequin pins in at least halfway on the canvas near the center of the cube to ensure that the pins wouldn't fall out. But, I didn't nail the sequin pins all the way in because I didnt want to lose the 3d nature of the boards. I made one 8x8 board with sequins in gold, silver, bronze, pink and magenta, a 4x4 board with alternating bronze and magenta, and one with just gold sequins. I am please with the way they turned out. I'd recommend putting foam board in the back of the canvas though to help secure the pins and keep from pricking yourself if you pick it up the wrong way.

make it: pom-pom wreath


This Christmas, I wanted to make my mom something for Christmas. After seeing Jordan Ferney's felt ball garland, I was inspired to make some of my own. Only to discover that felt balls are fairly pricey! Undaunted, I wandered through the aisles of Michael's craft store looking for some more reasonable substitutes and came upon brightly-colored chenille pom-poms. I put several bags in my cart,grabbed some thread, a needle and a wreath form and headed to the check out line.

Armed with my materials, I spread out on my mom's kitchen island and got to work, sorting the pom-poms by color and threading each one. I used about 15 of each color before going on to the next color. After I threaded several colors through, I began to wrap the threaded poms around the wreath form, securing them with hot glue.


I made sure to wrap the threaded poms tightly so none of the green styrofoam would show through. A few hours, several pin pricks and 20 some tracks of a Carpenter's Christmas later, I had finished my mom's Christmas present. And, I liked the end result so much I plan to make myself one too at some point. I also decided it wasn't so labor intensive that I couldn't make one or two for my Etsy shop, though I think I will make them to order.
Related Posts Plugin for WordPress, Blogger...